

Bill Wadman


William George Wadman started his pursuit of photography 'late' in life. Born on January 4, 1975 Wadman grew up in suburban Connecticut and attended University of Connecticut. After attending the University of Connecticut for two years, he earned a Bachelor's degree in music from Berklee College. Wadman spent a decade of his life dedicating it to his freelance art director career, but shortly after the world of photography caught Wadman's eye and he became a photographer. One of his most notable pieces of work is his 365 portrait website where he would take one photograph every day for an entire year in 2007, which you can find here: 365portraits.com.
Wadman does a wide range of photography, but one series of work I will particularly focus on is called 'Motion'. In this piece of work, Bill Wadman captures photos of dancers moving that turn into ethereal figures using long exposure. He claims that taking photos of dancers is easier than taking photos of others as they feel comfortable in moving front the camera and dance is one art form that eases the dancer. Wadman usually has the dancer wearing red or clothing that is the colour of their skin; he chose to do this as the red makes the dancer more visible to they eye and on the other hand the 'skin colour' clothing makes the dancer look naked but this enhances the flow of movement they are making as the only thing you can focus on is the motion and not some clothing. Moreover, the clothing is tight and is usually a two-piece which adds onto the focus of motion. He uses a dark background against his models to juxtapose the dancer to background to attract attention to the dynamic movements of the dancer so there is noting distracting in the background.
To capture his photographs Wadman shoots in a dark room with one soft light hanging from the ceiling, projecting onto the dancer to emphasis their movement, if the light was from the side there would be a shadow in the background which is not in the style of Wadman's alluring motion photographs. Using a Canon 5D Mark II, Wadman selected a 3-second exposure with his lens to f/11. This 3-second exposure allows the dancers' movement to be frozen into the image combined with the f/11 as it enhances the motion blur he was aiming for instead. Moreover, the 3-second exposure leaves the figures a more saturated blur emphasising the motion blue of the figures and although the figure is mainly blurred the increase of saturation highlights all the details of the dancer. He used a 35mm f/1.4 lens; this takes a wide photograph capturing all the details and main body of the dancer to which he later crops to 4×5 ratio so that the dancer is then the main focal point of the image.
Bill Wadman's dynamic motion photographs are very riveting; they all capture the flow of movement, but these dancing photographs contain more motion than others which makes it stand out from the rest. Not only does it have more movement but the dancer is also highlighted. I enjoy how there was a balance of the dancer's motion, but there was also a focus on the dancer them self standing out in the 'spotlight' which really intrigues me. However, Wadman's work is very repetitive with the same idea and concept every photo; I think that it would be interesting if Wadman had the model dancing against different coloured background along with even different styles of dance included into his work as it seems like all the dancers included into his work are all contemporary dancers.

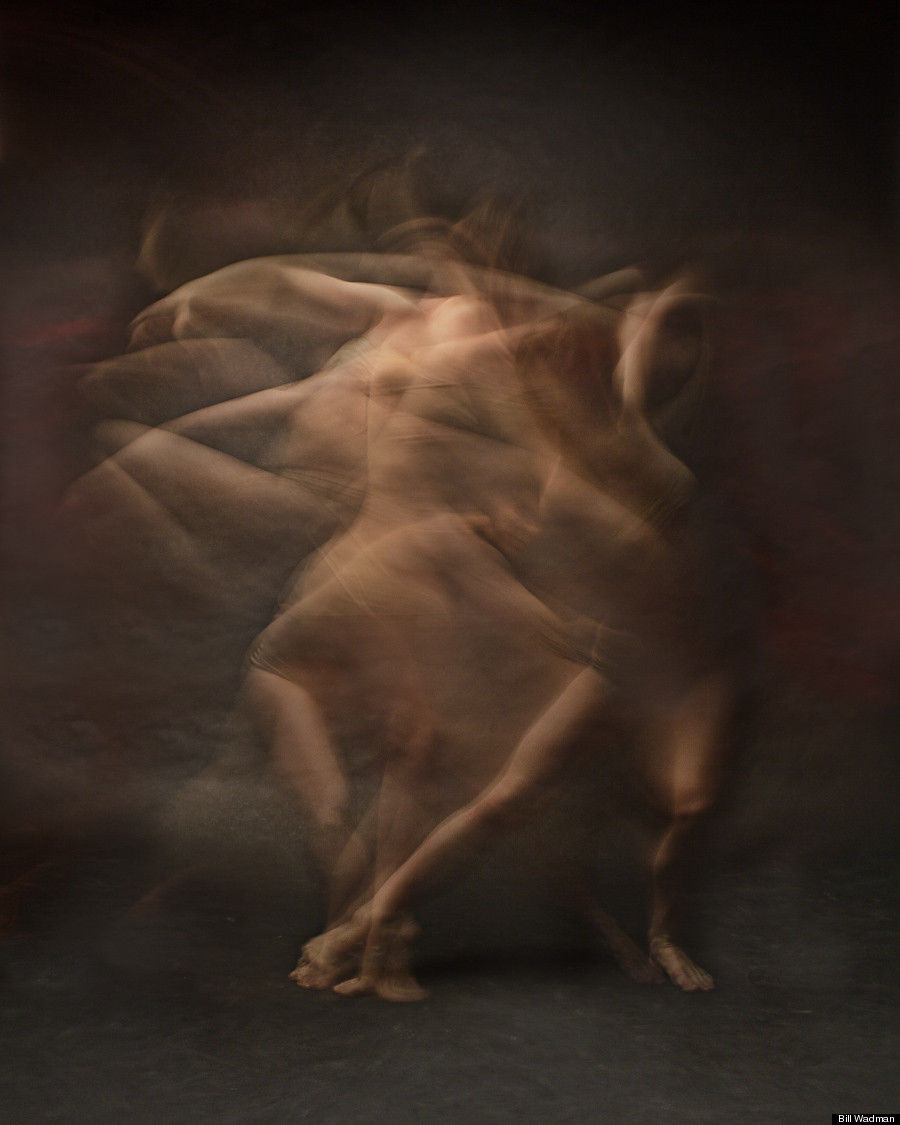
Untitled 2009: 'Motion'
This photograph was taken by Bill Wadman in his series called 'Motion' (2009). In this image you can see a slightly blurred figure of someone dancing; to stand out the photographer decided to make them wear this saturated red against the dull background so that it juxtaposes and therefore they stand out more. You can observe that they stood in one place ,but they moved around using their upper body making many blurred arms which exhibits time and space. To create this photograph, Bill Wadman used a Canon 5D Mark II with 35mm f/1.4 lens using a 3-second exposure. Deciding to use 3-second long exposure was a good decision as anything above would capture too much motion ,overwhelming the image, and anything below would be underwhelming. This links to my second artists ,Paolo Roversi, as they both experimented with fabric and long exposure creating this surreal atmosphere to go with their images. In my opinion, I am interested in this piece of work as the motion of the dancer is very mesmerizing and definitely pulls my attention in.

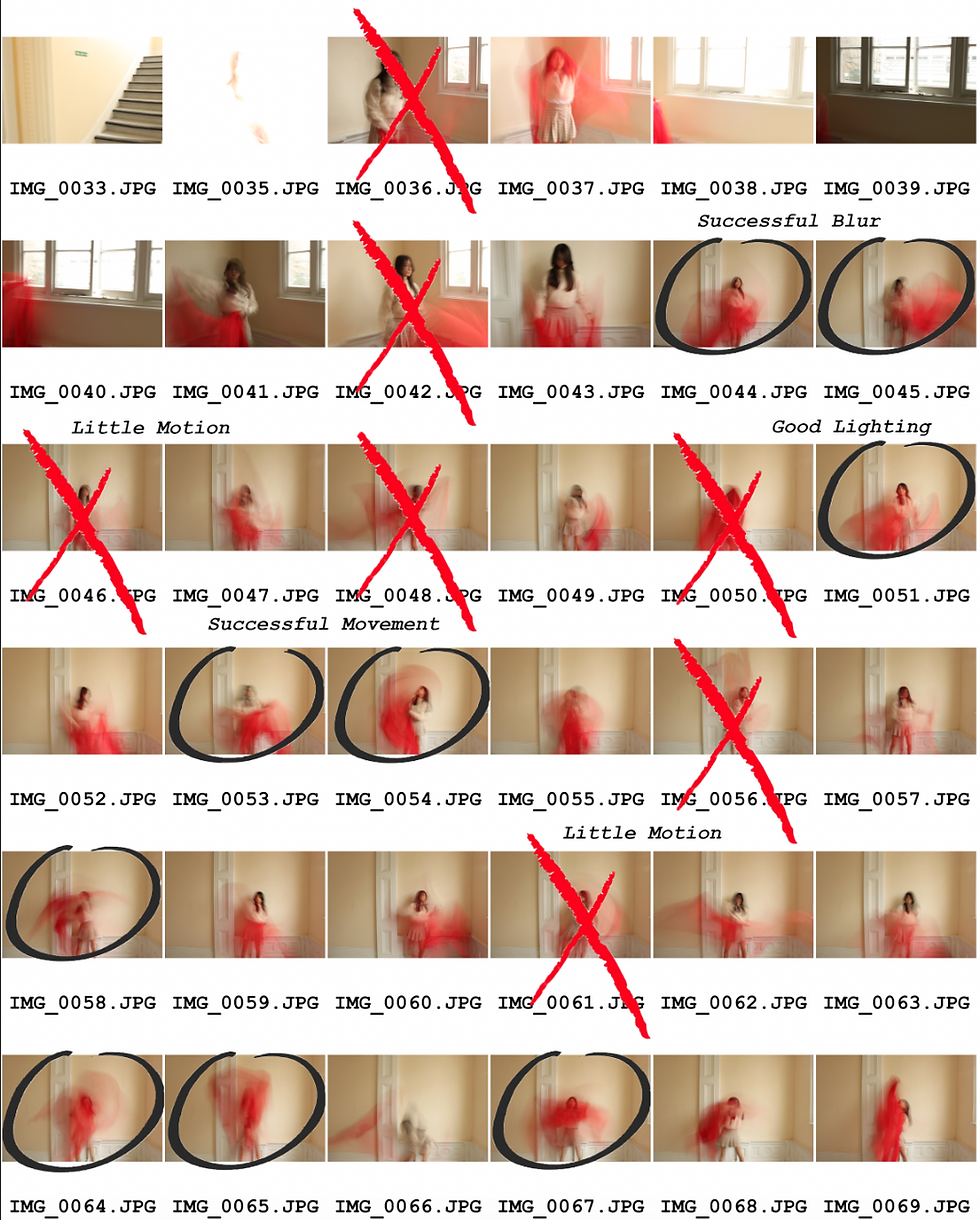
CONTACT SHEET


My intentions for this shoot was to try focus on my subject of the model and the fabric, but to also capture images that exhibited the fabric in motion similar to Bill Wadman's work. To shoot this images I decided to go with a shutter speed of 0"8 as I felt that that shutter speed captured the perfect amount of motion needed within my images; additionally I used an aperture of F9.0 because by the time I got to my location it was cloudy, and already turning a bit dark; finally I decided to use an ISO of 100 as all of the other ISOs I had experimented with were either overexposed (seen in images 9879-9885), or too underexposed (seen in images 0001-0031). One successful element was definitely the capture of motion as I thought that most of the images had the movement of the fabric shot very well. However, one unsuccessful element was how most the images were blurry and therefore unusable. To improve upon this I could have used a tri-pod to better capture the background without it being blurry. If I were to take these images again, I would take in in a more plain environment with more neutral ,and monotone colours so that my main focal point would stand out more in the same way as Bill Wadman's work.
PROCESS LOGS


To start this process off, I selected 'Black and White' and now I am adjusting the curve so the image is very bright. This is because later on I will mirror it and if I do not make it bright it will be really dark and very hard to see.
Now I have already copied and pasted the image by using 'Free Transform'. To flip the image, I have right-clicked and I am selecting 'Flip Horizontal' in order to flip the image and therefore mirror it.
To finish the process off, I have selected 'Multiply' to double expose and mirror the image on top of itself.
DEVELOPMENTS


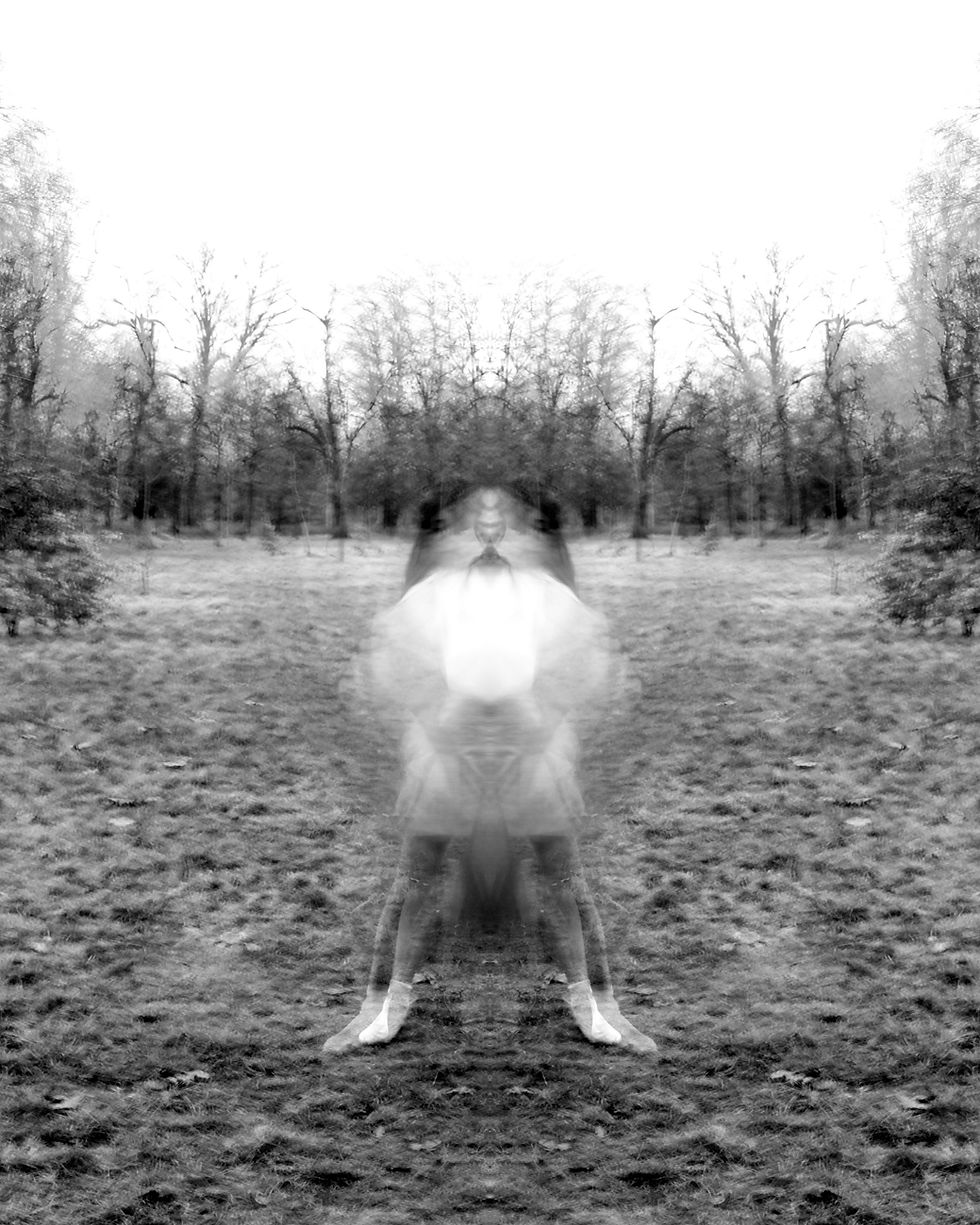


To start editing, I firstly selected 'Black and White', and adjusted the curve. When adjusting the curve I made it really light so when I double exposed it the image would not be too dark. Then, I selected the 'Rectangle Marquee Tool', and selected the entire photograph so that I could copy and paste it. After I pasted it onto itself, I right clicked on it, and selected 'Flip Horizontally' so that the image would flip and therefore be mirrored. I selected the blending option 'Multiply' as this option highlighted all of the light parts, and added a surreal element to it. I chose to mirror these developments as it expands this ambience of surrealism, but I also felt that the image before was too dull. These developments fit with the style with Bill Wadman as ,although my photographs compared to his have very different elements to it, they both have a common theme with 'Motion'. I wanted to exhibit time just like Bill Wadman ,but also make mine more surreal unlike his. An aspect that I quite enjoy is how much the surrealist element is demonstrated here; I think that all of the elements compliment each other well here. One aspect that I did not enjoy as much was how some images were a bit too burry even though I did try to avoid that when making my contact sheet. Next time I could possibly, flatten the image and adjust the curve so that it was not so light, and the image stood out more or just increase contrast.
FURTHER DEVELOPMENTS
impact on series


Here I decided to combine three images into one to exhibit the impact of series. If you have been following along with my work, you would notice a recurring theme in my work of demonstrating time. Here instead of presenting photographs with long exposure in them, I portrayed time with combining three images. I firstly selected images that I considered similar in contrast to each other, and then I calculated the average width and height of each image so that I could add all of them up so that I can know how big the new canvas should be. Afterwards, using the 'Rectangle Marquee Tool' I copied all of the images. To create a brand-new image, I went to 'File' and 'New'. I went onto the new image and pasted all of the three images onto the canvas, and using 'Free Transform' I sized all of them so that they were the same size and put them all next to each creating my new image. An aspect that I enjoy here is how well each image compliment each other really emphasising this theme of time along with expanding my use of long exposure. One aspect that I did not like was the selection of images. I should have been more thoughtful when selecting my images as some of the images I did pick were not as sharp as other developments I made. To expand upon my experimentation I will create a GIF.
FURTHER DEVELOPMENTS
GIF making
My intentions with this GIF was to expand my experimentation. To start creating this GIF I selected five image that I felt would work really successfully with each other, but also images that were similar in contrast and composition. I opened each image on Photoshop, and using the 'Rectangle Marquee Tool' I selected the first image, and pasted it onto each development. After pasting the image, I cropped the background to fit the first development so that the GIF would not be different in size and there would be a consistent size seen through out. I then opened 'gifmaker.me' to start my creation of the gif. To start I opened each image, and uploaded each image to the website. I decided to select 400 milliseconds as the rate of speed that the images would go. I believe that any higher would be too quick, and anything below would be a bit too slow. I thought that making this GIF fits in with my project as capturing photographs in the style of Bill Wadman combined with making a GIF really pulled his work all together. One aspect that I enjoyed was how the images did not take up all of the space as you can see at the top of the image with there being no sky being shown here; I thought this part added to the surrealism. One aspect I did not like was how the images were not smooth; I knew from the start this GIF was not going to be a very smooth one, but maybe I could have been more selective in my process.
CONTACT SHEET


For this photoshoot, I wanted to focus on the colours and tone in these photographs. One successful element would be the motion and movement of my images. I believe that I captured it well in my images ,making sure that the fabric's movement was displayed. Another successful element was definitely the lighting. Although some of my images were overexposed in many of my images the natural lighting really helped me with displaying the fabric's movement. One unsuccessful element was how in some images captured little to no motion. Despite the fact that I did state that my images captured motion well, some of my images did not capture enough motion and therefore I could not edit it. If I were to take these again I would try to improve upon how some images did not capture enough motion. I would do this by capturing even more images, or just by telling my model to be more frantic with her movements. For this project, I do believe that I have taken enough images, but maybe I could take even more next time.
REDRAFT
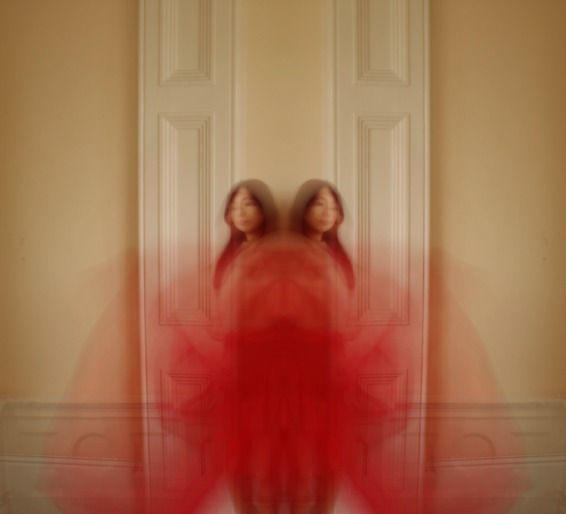


My aim here were to create photographs that were similar to my first shoot, but that also portrayed colour successfully. For this redraft, the editing process was very similar to my first shoot; using the rule of thirds, I cropped the image so that the model and the fabric was in the middle of the image. Thereafter, I used the 'Rectangle Marquee Tool' to copy and paste the image onto itself so that I could later double expose it to therefore mirror my image; I right-clicked on the image, and selected 'Flip Horizontally' which mirrored my image. Then, I selected the blending option 'Multiply' as it mirrored the image ,and did not look like I had pasted the image onto itself. To finish off the process I decided to adjust the curve so that the image was not too dark. I decided to go with this mirroring process throughout my page as it successfully demonstrates motion, but it also makes my photographs more engaging. Without this element I feel that my images would not be as successful as they are now. One successful element was the colour; the striking red stood out in this shoot (linking to Paolo Roversi), and it made my photographs stand out more. One unsuccessful element was the background as ,although it is less distracting from the last one, there are some details to the walls that take away from the foreground that I want you to focus on. To improve upon my work I will experiment with ways I can adjust the background to make my main focal point stand out more.
FURTHER DEVELOPMENTS


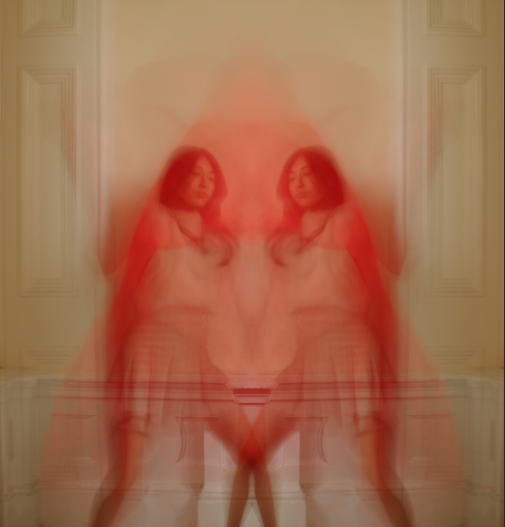
My goal here was to show improvement from my last shoot, which was making the background a bit less distracting. This process was more simple than my others, which consisted of going on 'Colour Lookup', and selecting '2Strip.Look'. This usually added this tint of pink to the photograph. Afterwards, I went to 'Image', and I selected 'Auto Tone'. This balanced out the colour in the image, getting rid of this pink tint making the overall image white (with the exception of the red fabric). This process was really simple, but really effective as it took away the cream colour off the walls, and replaced it with this plain white, which is exactly what I was aiming for when taking these photos. An aspect that I enjoyed was how most of the images came out predominately white as it made the main focal point of the image stand out therefore making the image more compelling. One aspect that I did not enjoy was how some images ended up with this tint of blue as ,although the pink and cream colours were gone, I had now had some blues in my images which was not my intention when making these further developments as I do not want anything else taking away the main spotlight from the red fabric and the model.
FURTHER DEVELOPMENTS
experimenting with black and white


I decided to make my developments black and white just like my first set to link them together, but to also experiment with my images. I firstly started the process by cropping the image ,so that it would be solely focused on the model and the fabric. Then I made it 'Black and White', and I used the 'Rectangle Maquee Tool' to copy and paste the image onto itself. Afterwards, I went to 'Free Transform' to hold down right-click and I selected 'Flip Horizontally' to mirror my image. I decided to use the blending option 'Multiply' just like all of the other developments as I want to keep my images very consistent and not have any major changes to them. Then, I selected 'Flatten Images', and to ensure my photos were not dark I went to 'Brightness/Contrast' and increased both as I needed to make the overall image brighter, and I increased the contrast as the model would blend into the background which is not my intentions. One successful element here was definitely how the model along with the fabric did not blend into the background; in many of these developments the fabric stood out creating these disorientating figures ,which is what my goal was for these further developments. To possibly improve for next time I could use the 'Move Tool', and use it to move the second layer outwards to better display the human figure along with the fabric.
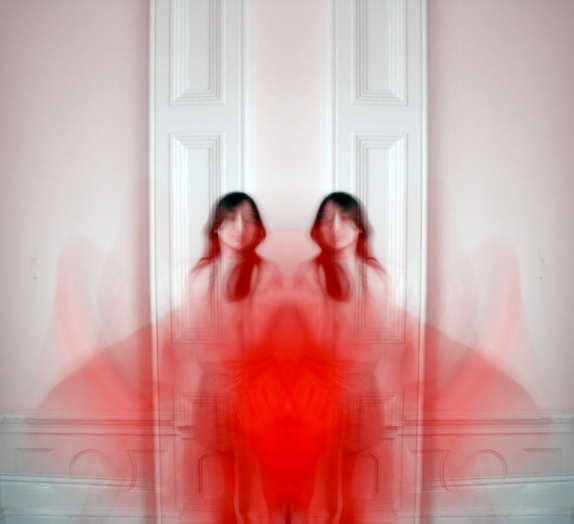
HIGHLIGHTING SUCCESS

I wanted to highlight this particular image as I thought this was more successful from the rest: the composition here was one of the many successful elements as it captures that surreal aspect, but it also perfectly displays the use of time and long exposure. It has the perfect amount of blur in it. I also believe the colours here are very successful as the red definitely stands out from the rest of the image, which is what my intentions were going into this. There is the right balance of red to white, which has the fabric stand out, but also the model.