
I D E A T W O : I M A G E T R A N S F E R S
R E A S O N F O R C H O S E N I D E A :
I have decided to make image transfers one of my final piece ideas as I have experimented with image transfers several times throughout my portfolio. An image transfer is when you transfer the ink from a printed image onto another surface (such as wood), making it more transparent than the original image. I have created eleven image transfers overall and have experimented with different colours, images, and canvas sizes to create variation within my work and explore different techniques. I have also experimented with different types of paint textures for my base coat. For example, I have tried transferring my images onto MDF boards that are already primed and I have also tried adding a thick layer of acrylic paint onto my MDF boards before transferring my images. I also selected image transfers as one of my final piece ideas as I have really enjoyed experimenting with this technique because it is very enjoyable and quite simple. I enjoyed watching the outcomes of my images and I think it is very satisfying to watch my image appear on the MDF board when I am scrubbing the excess paper off. This method has also been very successful for me when I have attempted to transfer my images. I also believe that image transfers are a very creative way of presenting my work as they appear printed onto wood which is something you wouldn't usually be able to do if you were to use a normal printer, so it adds a quite unusual feeling to my work. The method I used to create my image transfers is below:
I M A G E T R A N S F E R S T U T O R I A L :
Step one : begin by painting your MDF board with white acrylic paint. Ensure that your canvas is smooth beforehand by sanding it down if necessary(so that your images do not fall off). It is important that you use acrylic paint as I have attempted making image transfers using different kinds of paint, however, the images began to slip off and it did not work well. It is recommended that you use the colour white as the image will be printed transparent and it will not be visible if you use colours such as black.


Step two : After painting your MDF board and letting it dry, add a thick layer of modge podge to your MDF board over the acrylic paint. It is essential that you use modge podge instead of regular PVA glue because modge podge is used specifically for image transferring photos onto different objects and the PVA glue will not work.
Step three : After applying the modge podge, print your image out and stick it onto the board facing downwards, ensuring that you get rid of any air bubbles so that you get a clean image. You need to apply it face down or the modge podge will not transfer the image as it is facing the wrong way. Before doing this, make sure that your image is trimmed down to the same size as the MDF board to prevent the image from not sticking properly. Ensure that the image is properly stuck onto the board (facing down) or else the image will not be transferred. You must also ensure that you o this step quickly so that the modge podge does not dry out (or else the image will not be transferred).

(facing down)
.jpg)

Step four : After this, let the modge podge dry so that the image is properly transferred before you get rid of the excess paper. If you do not let it dry, your image will not be transferred as the ink from your image hasn’t properly been transferred onto the canvas.
Step five : Afterwards, use a wet sponge (preferably a kitchen sponge with a thin layer of slightly rougher material) to scrub the excess paper off the board. Ensure that the sponge isn’t too wet, or else your image might slip off, and ensure that it isn’t too dry, or else you might scrape the image off your board. When scrubbing the image, do not scrub too hard, as this can also scratch your image off the board. Ensure you get all of the excess paper off the board so that your image is clear and there are no light grey patches in the way.


Step six : After this, your board may be wet, which is normal. Do not try to dry it using a tissue or anything dry, as your image will be in a fragile state and it can easily scrape off. Instead, let the image dry.
Step seven : After letting your board dry, use a paintbrush and PVA glue and add a layer over your board to protect and seal the image in place, to make sure that it doesn’t get any scratches or peel off. Do not make this layer too thick, or else your image may become a little unclear. Ensure that there are no bubbles in the glue before you let it dry. You can also use alternatives such as varnish, to prevent your image from fading. And then your image is successfully transferred.

A N A L Y S I N G M Y W O R K :

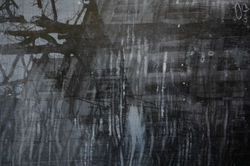
These are my first ever image transfers. For these pieces, I used one of my Michael Wesley developments; I split the image in half and used the method above to transfer the images onto the MDF boards. I think that these pieces turned out very successful for my first attempt. I mixed black and white acrylic paint for my base layers to give these pieces an antiquated and mysterious feeling to match the style of Michael Wesley. I also put more pressure when scrubbing some parts of my images to scratch some of the images off to give them a jagged and old effect which I believe turned out to be very successful. In addition, after scraping the excess paper off my images. I used a dry paintbrush and a small amount of acrylic paint to paint on a few dry strokes of black paint to add to this antiquated effect that I was trying to achieve when creating these pieces. To create these pieces, I firstly an A2-sized MDF board (not primed beforehand) and painted it with dry strokes of black and white paint to give it a scratched effect. After doing this I let the paint dry and printed out two A3 pages, both of the same image but split in half. I then trimmed the borders of the images using a guillotine. After the acrylic paint had dried, I used a paintbrush to add modge podge to the sides of the images with the ink on them, so that the ink would be transferred onto the MDF board. I then placed the images onto the MDF, making sure they were faced down so that the correct side of the images would be transferred. I then let them dry overnight. After this, I used a damp kitchen sponge (preferably with a slightly rough texture) to carefully scrub the excess paper off of the MDF, to reveal the transferred images beneath. I scrubbed some of the images off to add a damaged effect to the images to match the work of my artist. Finally, I added a thin layer of PVA glue to add a shiny effect to my piece and seal the ink in place. I then cut the MDF in half to create two mirrored pieces. I believe a successful element of my work was the interesting effect that I was able to create to make my images look worn out and antiquated. An element of my work that I would like to improve would have to be the clarity of my images. To improve this, I will only use white acrylic paint as my base coat and make sure to use several layers so that the brown colour of the wood is not visible. Overall, I think these pieces turned out to be very successful and I really enjoyed creating them and experimenting with image transfers for the first time.
S E C O N D A T T E M P T :
 |  |  |
|---|---|---|
 |  |  |
 |  |  |
 |  |  |
|---|---|---|
 |  |  |
 |  |  |
 |  |  |
 |  |  |
 |  |
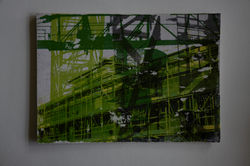
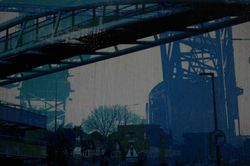
This series of images from my Hilly Van Eerten page are my second attempt at image transfers. I liked these pieces better than my previous black and white pieces because now that I had some experience with how to do image transfers, I believe that these pieces turned out better than my previous ones in terms of the clarity of the images. This was also my first time experimenting with coloured image transfers which were very interesting to try out. When creating these pieces, I initially had 10 MDF boards, however, one of them failed but fortunately, the other 9 image transfers were very successful. To create these pieces, I used a paint brush to paint all the MDF boards with acrylic paint (I bought the wood A5-sized so that I could experiment with series within my work). I then printed out 10 successful images from the same series (so that I would have several different images that still have the same style). After this, I applied modge podge onto the side with (dry) acrylic paint and stuck my images onto the MDF board facing down so that the ink could be transferred. I then let them dry overnight and used a kitchen sponge the next day to gently scrub the excess paper off to reveal my transferred images. I applied more pressure when scrubbing the excess paper off in some areas to also give my pieces an antiquated effect (as you can see with the faded white borders and small scratch marks). I did this to match the style of my artist’s work and to give it an urban feeling that you would usually associate with construction sites. Afterwards, I finally added a top coat of PVA glue to seal the ink in and protect my images from fading. A successful element of these pieces would have to be the clarity of the images and how vibrant the colours remained even after being transferred. To improve, I will ensure that I do not scrub my images too hard so that the images do not peel off. I tried this with the 10th image transfer, however unfortunately the image began to fall off. Overall, I really enjoyed experimenting more with image transfers and learning what I should and shouldn’t do when creating image transfers.
H I G H L I G H T I N G S U C C E S S :

I think that this image transfer turned out to be very successful as the image is very clearly transferred onto the MDF board and the wide variety of colours are still vibrant even after being transferred from one surface to another. I also really like the scratched effect of the sponge on the image as it adds an urban and antiquated feeling to my work and matches the style of Hilly Van Eerten. I think the white patches create contrast as the image is very colourful and the background is a simplistic colour such as white (in this instance). I also really like the wide variety of colours in the image and how nicely they look transferred.
 |  |  |
|---|---|---|
 |  |  |
 |  |  |
 |  |  |
 |  |  |
 |  |  |
 |  |  |
 |  |  |